Skip to content

Grade 10 · Core Mathematics · Lesson 11 of 21

Determining Column Vectors from Coordinates and Diagrams

A Grade 10 Core Mathematics CBE lesson from the sub-strand Vectors I. In it, learners plot given points on a Cartesian plane and construct horizontal and vertical component lines.

Strand Measurements and GeometrySub-strand Vectors ILesson code 10CM-28-L1140 minutes · 2 slides

KICD learning outcome (g)

Determine column vectors in different situations.

By the end of this lesson, learners should be able to

  1. Plot given points on a Cartesian plane and construct horizontal and vertical component lines.
  2. Express vector displacements as column vectors using horizontal and vertical component additions.

Key vocabulary

Column vector
A pair of numbers stacked vertically representing horizontal and vertical displacements of a vector.
Vector PQ is represented by the column vector (43).
Displacement vector
A vector showing the straight-line change in position from a starting point to an ending point.
The displacement vector from A(2,1) to B(5,6) is vector AB⃗.

Lesson preview

Slide 1 · Representing Displacements on a GridOpening · 18 min
A Cartesian grid displaying points P and Q, with horizontal and vertical lines intersecting at M to form a right-angled triangle.
Figure 1: A Cartesian grid displaying points P and Q, with horizontal and vertical lines intersecting at M to form a right-angled triangle.

When moving from an initial point to a terminal point on a grid, the total displacement combines horizontal and vertical movements. By drawing lines parallel to the horizontal and vertical axes through the endpoints, we form a right-angled triangle. The horizontal distance gives the x-component and the vertical distance gives the y-component of the column vector. These two perpendicular displacements combine to give the total displacement vector. Use Figure 1 to see how these horizontal and vertical lines form a right-angled triangle.

  • Plotting points on a Cartesian plane establishes precise starting and ending positions for a vector displacement.
  • A line drawn through the starting point parallel to the horizontal axis shows the x-component.
  • A line drawn from the terminal point parallel to the vertical axis determines the y-component.
  • The intersection of these grid lines forms a right-angled triangle that breaks the vector into components.
Worked example. Identify initial point P(1,2) and terminal point Q(5,5). Find intersection point M of the horizontal line through P and vertical line through Q, giving M(5,2). Calculate horizontal component PM⃗=5−1=4 units to the right. Calculate vertical component MQ⃗=5−2=3 units upwards. Combine vector components to get PQ⃗=PM⃗+MQ⃗=(43). Answer: PQ⃗=(43).

Check question: A vector starts at point R(2,3) and ends at point S(6,8). If a horizontal line through R intersects a vertical line through S at point N, what are the coordinates of N and the column vector RS⃗?

  1. N(6,3) and RS⃗=(45)
  2. N(3,6) and RS⃗=(54)
  3. N(2,8) and RS⃗=(45)
  4. N(6,3) and RS⃗=(811)
Show answer

N(6,3) and RS⃗=(45). Point N shares the x-coordinate of S(6) and the y-coordinate of R(3), so N(6,3). The horizontal move is 6−2=4 and vertical move is 8−3=5, giving (45).

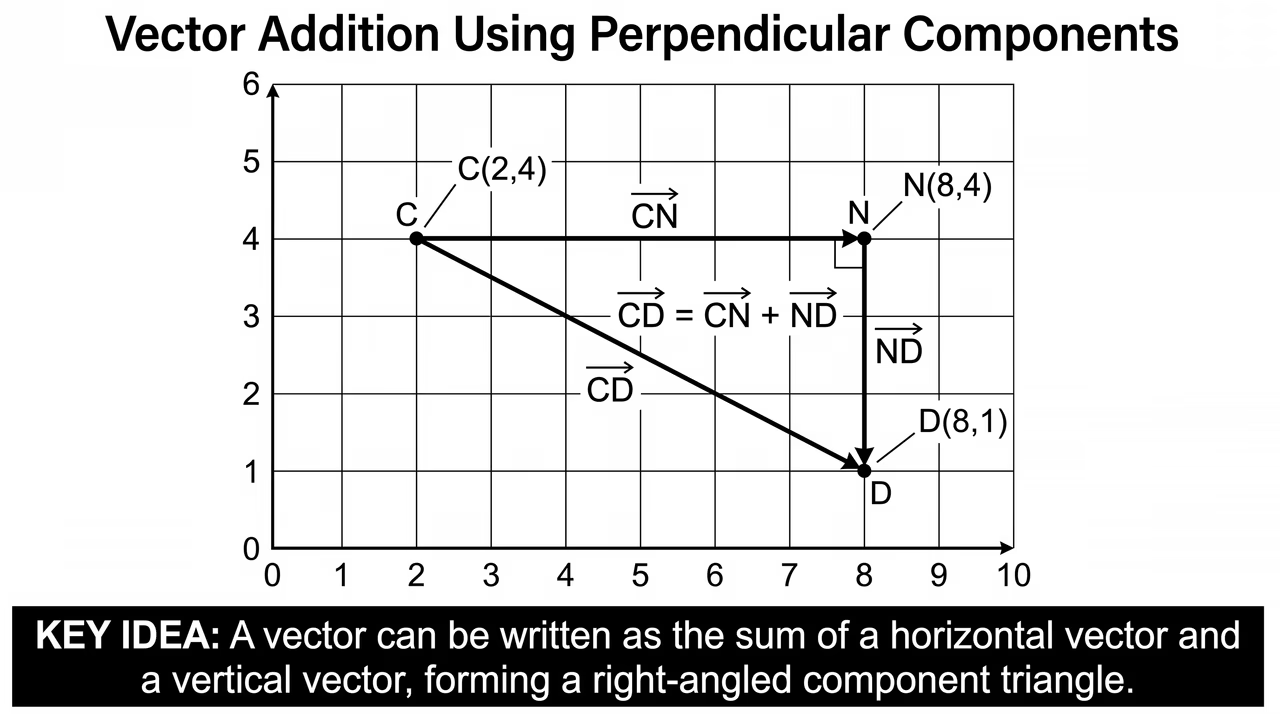
Slide 2 · Forming Column Vectors from Perpendicular ComponentsPractice · 22 min
A vector diagram showing horizontal vector CN and vertical vector ND being added together to find the resultant vector CD.
Figure 2: A vector diagram showing horizontal vector CN and vertical vector ND being added together to find the resultant vector CD.

Teach the full lesson on the projector

This lesson, and every other Grade 1–10 CBE lesson, comes ready to project with the EAP ClassKit. It runs without electricity or internet.

  • Both slides with diagrams and class activities
  • Teacher notes, SNE adaptations and assessment checks
  • Homework and the other 20 lessons in this sub-strand

All 21 lessons in Vectors I

  1. 1Explaining Vector and Scalar QuantitiesExplain vector and scalar quantities with illustrations
  2. 2Using Vector Notations in Different WaysUse vector notations in different ways
  3. 3Representing Vectors GeometricallyRepresent vectors geometrically in different situations
  4. 4Representing Vectors Geometrically in Different SituationsRepresent vectors geometrically in different situations
  5. 5Identifying Equivalent VectorsIdentify equivalent vectors in different situations
  6. 6Equivalent VectorsIdentify equivalent vectors in different situations
  7. 7Adding Vectors GeometricallyAdd vectors in different situations
  8. 8Adding Vectors Geometrically in Different SituationsAdd vectors in different situations
  9. 9Multiplying Vectors by ScalarsMultiply vectors by scalars
  10. 10Multiplying Vectors by Scalars: Graphical Construction and Scalar RatiosMultiply vectors by scalars
  11. 11Determining Column Vectors from Coordinates and DiagramsDetermine column vectors in different situations
  12. 12Determining Column Vectors and Vector ArithmeticDetermine column vectors in different situations
  13. 13Determining Position Vectors from the OriginDetermine position vectors in different situations
  14. 14Determining Position Vectors and Calculating Vector DisplacementsDetermine position vectors in different situations
  15. 15Calculating the Magnitude of a VectorWork out magnitude of a vector in different situations
  16. 16Working Out Vector Magnitudes in Different SituationsWork out magnitude of a vector in different situations
  17. 17Determining the Midpoint of a VectorDetermine the midpoint of a vector in different situations
  18. 18Determining Vector Midpoints and Endpoint CoordinatesDetermine the midpoint of a vector in different situations
  19. 19Determining Translation Vector as a TransformationDetermine translation vector as a transformation
  20. 20Determining Translation Vectors as TransformationsDetermine translation vector as a transformation
  21. 21Appreciating Vectors in Real-Life SituationsAppreciate the use of vectors in real-life situations