Skip to content

Grade 10 · Core Mathematics · Lesson 9 of 11

Application of Trigonometric Ratios to Angles of Elevation and Depression

A Grade 10 Core Mathematics CBE lesson from the sub-strand Trigonometry 1. In it, learners identify angles of elevation and depression using horizontal reference lines and right-angled triangle models.

Strand Measurements and GeometrySub-strand Trigonometry 1Lesson code 10CM-24-L940 minutes · 3 slides

KICD learning outcome (e)

Apply trigonometric ratios to angles of elevation and depression.

By the end of this lesson, learners should be able to

  1. Identify angles of elevation and depression using horizontal reference lines and right-angled triangle models
  2. Calculate unknown angles of elevation, depression, and road slopes using inverse trigonometric ratios
  3. Determine unknown horizontal distances and heights from elevated vantage points using tangent and sine ratios

Key vocabulary

Angle of Elevation
The angle formed between a horizontal line and the line of sight looking upwards.
The angle of elevation to a 120 m mast top from 50 m away is 67.38°.
Angle of Depression
The angle formed between a horizontal line and the line of sight looking downwards.
From a 120 m mast top, point A 50 m away has depression 67.38°.
Angle of Slope
The angle formed between an inclined surface and the horizontal ground plane.
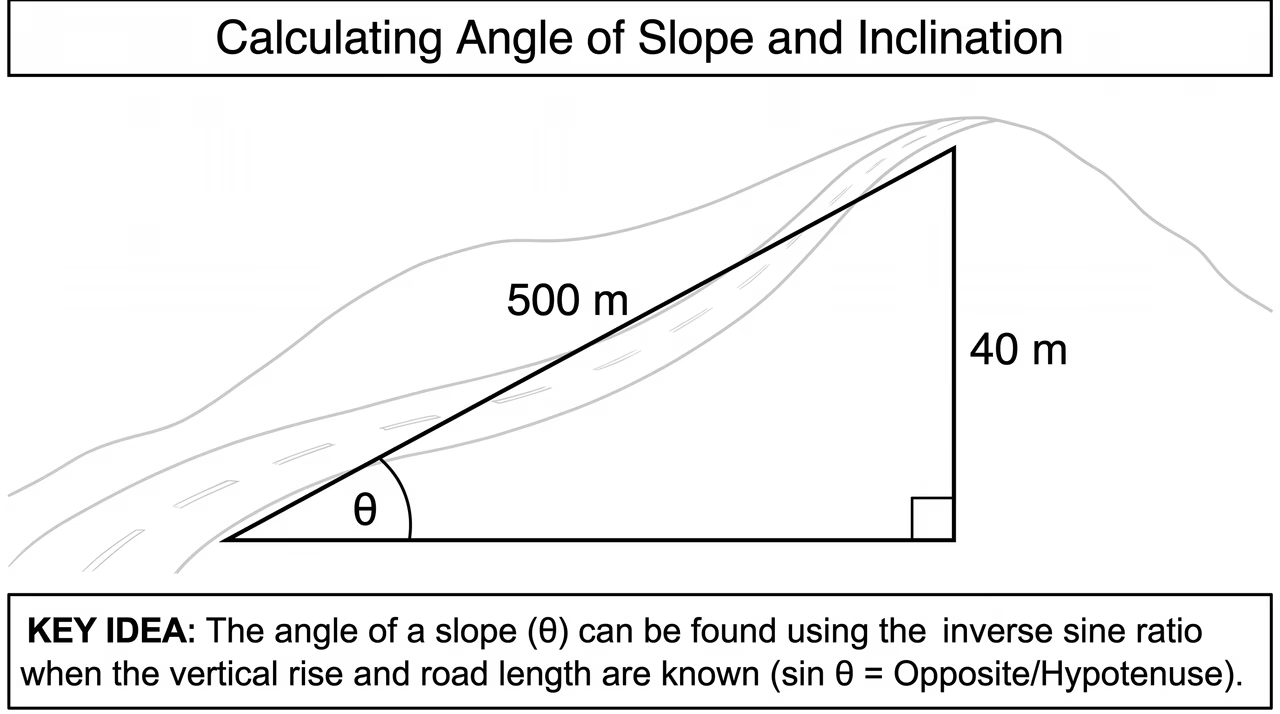
The angle of slope of a 500 m road rising 40 m is about 4.59°.
Line of Sight
An imaginary straight line extending from an observer's eye to an observed object.
The line of sight from the cliff top to the boat is the hypotenuse.

Lesson preview

Slide 1 · Understanding Angles of Elevation and DepressionOpening · 12 min
A right-angled triangle shows the relationship between the angle of elevation from point A and the angle of depression from point M.
Figure 1: A right-angled triangle shows the relationship between the angle of elevation from point A and the angle of depression from point M.

When observing objects above or below horizontal eye level, we form right-angled triangles. The angle of elevation is the upward angle measured from the horizontal to an object above. The angle of depression is the downward angle from a top horizontal line to an object below. Because horizontal lines are parallel, the angle of elevation from an observer to a tower top equals the angle of depression from the top to the observer. Use Figure 1 to visualise why the angle of elevation is equal to the angle of depression.

  • The angle of elevation is measured upwards from the horizontal line of sight to an elevated object.
  • The angle of depression is measured downwards from the horizontal line of sight to a lower object.
  • Alternate interior angles between parallel horizontal lines make the angle of elevation equal to the angle of depression.
  • Right-angled triangles model real situations by connecting vertical heights, horizontal distances, and lines of sight.
Worked example. Identify the right-angled triangle with vertical height 120 m and horizontal base 50 m. Set up the tangent ratio for the angle of elevation θ: tan⁡θ=oppositeadjacent=12050=2.4. Calculate the angle using inverse tangent: θ=tan⁡−1(2.4)≈67.38∘. Conclude that by alternate interior angles, the angle of depression from the mast top to A is also 67.38∘. Answer: Angle of elevation = 67.38∘, Angle of depression = 67.38∘.

Check question: A vertical phone tower is 40 m high. Point B on the ground is 30 m from its base. What is the angle of elevation of the peak of the tower from B?

  1. 36.87∘
  2. 41.41∘
  3. 48.59∘
  4. 53.13∘
Show answer

53.13∘. Using the tangent ratio, tan⁡θ=oppositeadjacent=4030≈1.3333. Taking the inverse tangent, θ=tan⁡−1(1.3333)≈53.13∘.

Slide 2 · Calculating Angles of Slope and InclinationModel · 14 min
A right-angled triangle superimposed on a hill shows an incline length of 500 m and a vertical rise of 40 m.
Figure 2: A right-angled triangle superimposed on a hill shows an incline length of 500 m and a vertical rise of 40 m.

Teach the full lesson on the projector

This lesson, and every other Grade 1–10 CBE lesson, comes ready to project with the EAP ClassKit. It runs without electricity or internet.

  • All 3 slides with diagrams and class activities
  • Teacher notes, SNE adaptations and assessment checks
  • Homework and the other 10 lessons in this sub-strand

All 11 lessons in Trigonometry 1

  1. 1Reading Sines and Cosines from Mathematical TablesDetermine the trigonometric ratios of acute angles from mathematical tables and calculators
  2. 2Finding Cosine and Tangent Values of Acute AnglesDetermine the trigonometric ratios of acute angles from mathematical tables and calculators
  3. 3Determining Trigonometric Ratios from Tables and CalculatorsDetermine the trigonometric ratios of acute angles from mathematical tables and calculators
  4. 4Connecting Sine and Cosine in Complementary AnglesRelate sines and cosines of complementary angles
  5. 5Solving Trigonometric Equations with Complementary AnglesRelate sines and cosines of complementary angles
  6. 6Relating Sine, Cosine, and TangentRelate the sine, cosine and tangent of acute angles
  7. 7Trigonometric Ratios of Special Angles: 30° and 60°Determine trigonometric ratios of special angles: 30°, 45°, 60° and 90° using triangles
  8. 8Trigonometric Ratios of Special Angles: 45° and 90°Determine trigonometric ratios of special angles: 30°, 45°, 60° and 90° using triangles
  9. 9Application of Trigonometric Ratios to Angles of Elevation and DepressionApply trigonometric ratios to angles of elevation and depression
  10. 10Applying Trigonometric Ratios to Angles of Elevation and DepressionApply trigonometric ratios to angles of elevation and depression
  11. 11Reflecting on Real-Life Applications of TrigonometryReflect on the use of trigonometry in real-life situations